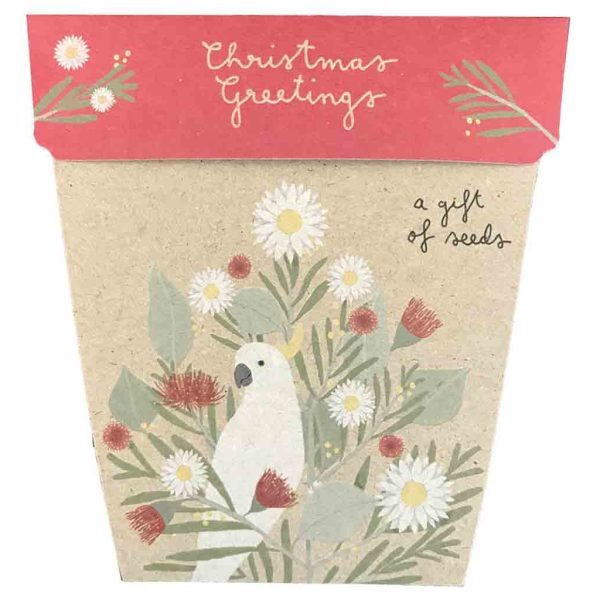
SOW ‘N SOW Gift Of Seeds Christmas Greetings
USD $7.15
Out of stock
Description
Sow n Sow Gift of Seeds Christmas Greetings
Gift of Seeds is a cleverly designed greeting card that makes gifting purposeful and enjoyable. It contains Everlasting Daist seeds that grow into beautiful blooms. The card features a lovely Christmas illustration by Melbourne artist Daniella Germain that’s printed with soy-based ink on 100% post-consumer waste recycled card. Sow n Sow’s seeds are non-hybrid, open-pollinated, non GMO varieties sourced from reputable suppliers. The seeds are packaged in a recycled envelope with a biodegradable tear-away plant label. Connect with nature and enjoy life’s simple pleasures!
Vegan and cruelty-free. Dimensions – 12.6 × 13.2 × 0.2 cm
Starting seeds indoors, follow these easy steps:
- Find some trays or pots and fill them with seed raising mix. The soil should be slightly moist.
- Place your seeds into the soil. Make sure that you only place the seeds approximately twice as deep as the seed is wide. Our Gifts of Seeds indicate the sow depth on the inside of the package.
- Give the soil a good misting to ensure it is moist. Spray bottles are nice and gentle and will ensure the seed isn’t dislodged while watering.
- Keep moist. Whilst waiting for your seeds to germinate, make sure that the soil stays moist. If the top layer of soil is dry, give it a good spray. Make sure the tray is in a position where they receive lots of light but nothing too harsh. If you live in a cool region you can cover your seeds with something clear to keep the moisture in.
- When the seedlings have sprouted and have their first set of ‘true leaves’ (which is generally the second set of leaves) they will need to be fed. Otherwise, they tend to just stay at this small size and they generally won’t grow anymore. Use worm juice for a worm farm or a liquid fertiliser.
- Harden the seedlings. Before the seedlings can be transplanted, they need to be ‘hardened off’ which means getting them accustomed to the sun. If you miss this step, there is a good chance that your seedling will not survive very long once transplanted into the ground. About one week before you plan to transplant, start to introduce them to gentle sunlight and then increase their exposure slightly each day. Make sure you continue to water the seedlings, but don’t overdo it either. Too much water will produce weak roots.
- The final step is transplanting your seedlings to either the garden or a pot. Remove the seedling from the tray by squeezing either side of the container gently. Dig a hole as long as the roots, and place the roots into the ground. Push soil around the seedling and gently push the soil down to firm it and stabilize. Don’t forget to gently water the seedling once it has been placed into the ground/pot to allow its roots to soak into the soil.
When direct sowing seeds, follow these steps:
This method is actually a lot easier and the seedlings grow into strong plants as they are accustomed to the soil and sunlight right from the beginning.
- Prepare an area of your garden by pulling back any mulch and pulling out any weeds or old plants. A sunny spot is generally best as most flowers, herbs and vegetables prefer lots of sun. Till the soil a little so you have a nice base to bury the seeds into. You could also add some seed raising mix or potting mix to the top if your soil isn’t looking too great.
- Place the seeds into the soil twice as deep as the seed is wide. I’d plant one seed at 10cm intervals, but you can also just scatter some seed and cover it with soil. It really depends on how big the seed is!
- Water the bed and try to keep it fairly moist over the next week. Watering it once or twice a day will do the trick until the seeds have germinated.
- Thin the seedlings out! It’s very easy to end up with seemingly hundreds of little seedlings especially if you have done a ‘scatter and cover’ approach. Pulling out the precious little seedling babies feels mean but you’ll end up with stronger plants if you thin them down and give each seedling space to get the nutrients it needs.
- Watch them grow! Once they’ve got a few sets of leaves I tend to back off on watering them as the plant will be weak and will be reliant on getting lots of water if you keep watering too much. Hopefully the rain will do this job for you too. If it’s looking droopy then give it a drink! If it’s perky and happy then leave it be.
Ingredients: Everlasting Daisy seeds – Rhodanthe chlorocephala, 100% post-consumer waste recycled card, soy-based inks.
Additional information
| Weight | 0.1 kg |
|---|---|
| Dimensions | 10 × 15 × 1 cm |












 HAPPY WAY Vegan Protein Powder Banana 500g
Reviews
There are no reviews yet